Bearer Auth and Basic Auth Vapor 4

Bearer authentication and Basic authentication are two common types of authentication mechanisms. In Vapor 4, these authentication mechanisms can be easily implemented using the built-in authentication middleware.
This article will complete on Mikaela Caron’s tutorial (songs API) , It is the best resource to start learning Vapor, But if you have some prior knowledge, you can keep reading.
You can find the songs API source code on Github here:
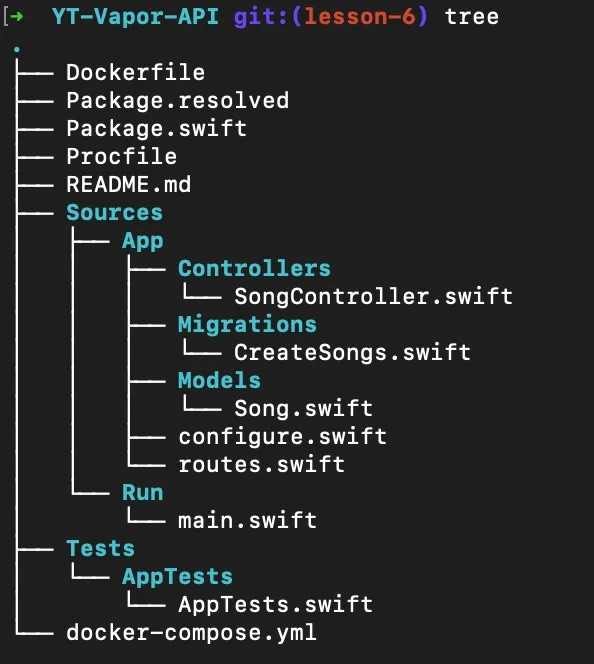
The project structure:

Difference between authentication and Authorization
Authentication is the process of verifying you are who you are.
Authorization is the process of verifying what you have access to.
Basic Auth
Basic auth is probably the simplest model of Authentication for APIs. To authenticate using basic auth, you should send a set of username & password to the API. To send the username & password, you should add the Authorization header to your request. The Authorization header must start with Basic .
Bearer authentication
Bearer authentication sends a token in the Authorization header. The token is prefixed with “Bearer “.
Bearer authentication is commonly used for authentication of API endpoints. The user typically requests a Bearer token by sending credentials like a username and password to a login endpoint. This token may last minutes or days depending on the application’s needs.
Yes it is possible to only depend in basic auth and ask for user credentials in each request, but its inconvenience and unsafe because it creates an opportunity for hackers to intercept and exploit this information. In the other hand token based authentication provides an extra layer of security to protect user’s data. Tokens have a very short lifespan and are generated for each login session to ensure that user credentials are not exposed during data transfer. Additionally, tokens can be easily revoked, in case of a data breach.
How to implement basic auth and Bearer auth in Vapor?
First we will start with Basic Auth, you will send your username and password in the body to the API to create an account. Then for the Bearer Authentication, you will first authenticate using a username/password (Basic Auth)in the login route to get a token and then use the token to authorize your requests.
I believe the majority of it should be fairly self-explanatory.
1-Add User Model:
import Fluent
import Vapor

final class User: Model {
    static let schema = "users"

    @ID
    var id: UUID?

    @Field(key: "username")
    var username: String

    @Field(key: "password")
    var password: String


    @Children(for: \.$user)
    var songs: [Song]

    init(){
    }
    init(id: UUID? = nil, email: String, password: String) {
        self.id = id
        self.username = email
        self.password = password
    }

    struct Public: Content {
        var id: UUID?
        var username: String
    }
}
extension User: Content {}

extension User {
    func convertToPublic() -> User.Public {
        User.Public(id: self.id, username: self.username)
    }
}

extension User: ModelAuthenticatable {
    static let usernameKey = \User.$username
    static let passwordHashKey = \User.$password

    func verify(password: String) throws -> Bool {
        try Bcrypt.verify(password, created: self.password)
    }
}
2- Add Token Model:
import Vapor
import Fluent
final class Token: Model, Content {
    static let schema = "tokens"

    @ID
    var id: UUID?

    @Field(key: "value")
    var value: String

    @Parent(key: "userID")
    var user: User

    init() {}

    init(id: UUID? = nil, value: String, userID: User.IDValue){
        self.id = id
        self.value = value
        self.$user.id = userID
    }
}
extension Token {
    static func generate(for user: User) throws -> Token {
        let random = [UInt8].random(count: 16).base64
        return try Token(value: random, userID: user.requireID())
    }
}
extension Token: ModelTokenAuthenticatable {
    typealias User = App.User
    static let valueKey = \Token.$value
    static let userKey = \Token.$user

    //you caan check expiry dates in here, for this example its always true
    var isValid: Bool {
        true
    }
}
3- Modify the Song Model:
// add the userID column
   @Parent(key: "userID")
   var user: User

//modify the constructor
 init(id: UUID? = nil, title: String ,userID: User.IDValue) {
       self.id = id
       self.title = title
       self.$user.id = userID. }
4- Add User and Token Migrations and modify CreateSongs Migration
import Fluent

struct CreateUser: AsyncMigration {
   func prepare(on database: Database)  async throws {
       try await   database.schema("users")
           .id()
           .field("username", .string ,.required)
           .field("password", .string ,.required)
           .create()
   }

   func revert(on database: Database) async throws {
       try await   database.schema("user").delete()
   }
}
struct CreateToken: AsyncMigration {


   func prepare(on database: Database)  async throws {
       try await    database.schema("tokens")
           .id()
           .field("value", .string, .required)
           .field("userID", .uuid, .required, .references("users", "id", onDelete: .cascade)).create()
   }


   func revert(on database: Database)  async throws {
       try await   database.schema("tokens").delete()
   }
}
// after modifications
struct CreateSongs : AsyncMigration  {

   func prepare(on database: Database) async throws {
       try await database.schema("songs")
           .id()
           .field("title", .string, .required)
           .field("userID", .uuid, .required, .references("users", "id"))
           .create()
   }

   func revert(on database: Database) async throws {
       try await database.schema("songs").delete()
   }
}
5- then add the migrations in the configure file, make sure to add the user before the songs since the songs depend on the user table.
6- Create UsersController
import Foundation
import Vapor
struct UsersController: RouteCollection {

    func boot(routes: RoutesBuilder) throws {
        let usersRoutes = routes.grouped("api", "users")

        usersRoutes.post( use: creatHandler)

        // here you are protecting the login route
        //  only authenticated users can acsess it
        let basicAuthMiddleware = User.authenticator()
        let basicAuthGroup = usersRoutes.grouped(basicAuthMiddleware)
        basicAuthGroup.post("login", use: loginHandler)


    }
    // sign up
    func creatHandler(_ req: Request) throws -> EventLoopFuture<User.Public> {
        // acsess the user username and password
        let user = try req.content.decode(User.self)
        // hashing the password with Bcrypt algorthim before saving
        user.password = try Bcrypt.hash(user.password)
        return user.save(on: req.db).map {
          // convert to public to hide the password and return the data in the response
            user.convertToPublic()
        }
    }

    // log in
    func loginHandler(_ req: Request) throws -> EventLoopFuture<Token> {
        // acsess the user username and password
        let user = try req.auth.require(User.self)
        // generate the token and return it in the resposne
        let token = try Token.generate(for: user)
        return token.save(on: req.db).map {token}
    }
}
then register the UsersController in the routes file.
7- Modify SongController
For create and index functions, we used to let index return all the songs without knowing who added them, same way in create we add the song without associating it to a user. This is how we are going to change them:
import Fluent
import Vapor

struct SongController: RouteCollection {
    func boot(routes: RoutesBuilder) throws {
        let songs = routes.grouped("songs")
       // add tokenAuthMiddleware
        let tokenAuthMiddleware = Token.authenticator()
        let guardAuthMiddleware = User.guardMiddleware()
        let tokenAuthGroup =  songs.grouped(tokenAuthMiddleware, guardAuthMiddleware)

        //all the routes now requires a token to acsess
        tokenAuthGroup.get(use: index)
        tokenAuthGroup.post(use: create)

    }

    // GET Request /get songs for user route
    func index(req: Request) async throws -> [Song] {
       //acsess user data
        let user = try req.auth.require(User.self)
        let userID = try user.requireID()
        //filter the database to return only user songs
     return  try await Song.query(on: req.db) .filter(\.$user.$id == userID).all()
    }
    // POST Request /add songs route
    func create(req: Request) async throws -> HTTPStatus {
        let user = try req.auth.require(User.self)
        let data = try req.content.decode(CreateSongData.self)
        // Creating a song to s spicefic user
        let song = try Song(title: data.title, userID: user.requireID())
        try await song.save(on: req.db)
        return .noContent
    }
}
// used to acsess only the song title from the body
struct CreateSongData: Content {
    let title: String
}
Before running the app, you need to reset the database because we changed the song table.
remove the existing database in docker:
docker rm -f yourcontainername and start it again:
docker run --name yourcontainername -e POSTGRES_DB=vapor_database \
  -e POSTGRES_USER=vapor_username -e POSTGRES_PASSWORD=vapor_password \
  -p 5432:5432 -d postgres
Test with Postman:


Conclusion
choosing the appropriate authentication mechanism depends on the specific context and security requirements of the system. If the authentication situation for an application is not as security demanding, and the developers want a simple authentication standard, then they can still make use of basic authentication.
source code : here
if you’re interested in the app side of the project, check this repo
Thank you so much for reading my article 💖! Please let me know if you have any suggestions or changes! I would love hearing from you.